Make sure this part fits

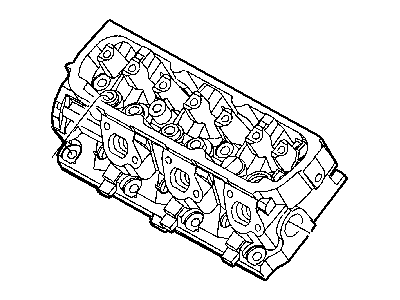
Jeep R5633411AB Head-Cylinder

2007-2011 Jeep Wrangler R5633411AB

Customer Questions & Expert Answers (12)
Mopar R5633411AB Head-Cylinder
  • Part Description
    Head Cylinder
  • Manufacturer
    Mopar
Make sure this part fits
$852.35 MSRP: $1035.00
You Save: $182.65 (18%)
Core Charge: $150.00
1
ADD TO CART
  • Related Parts
  • Product Specifications
  • Vehicle Fitment
  • Customer Questions & Expert Answers
  • Product Specifications

    BrandGenuine Jeep
    Manufacturer Part NumberR5633411AB
    Part DescriptionHead Cylinder
    Item Dimensions10.1 x 10.4 x 21.6 inches
    Item Weight26.50 Pounds
    ConditionNew
    Fitment TypeDirect Replacement
    Require Quantity2
    ManufacturerMopar
    SKUR5633411AB
    WarrantyThis genuine Mopar part is guaranteed by Mopar's factory warranty.
    Shipping & ReturnShipping Policy Return Policy
    Warning: California’s Proposition 65
  • Vehicle Fitment

    Year Make Model Engine Important vehicle option details
    2007-2011 Jeep Wrangler6 Cyl 3.8L70th Anniversary, Rubicon, Sahara, Sport, Unlimited Rubicon, Unlimited Sahara 2WD, Unlimited Sahara 4WD, Unlimited Sport 2WD, Unlimited Sport 4WD, Unlimited X 2WD, Unlimited X 4WD, Unlimited X RHD 4WD, X, X RHD
  • Customer Questions & Expert Answers

    Q:
    This part will not fit my vehicle. Can you provide me with the part number for the bracket that will fit? TN. Posted by MoparPartsGiant Specialist
    A:
    You can Select Your Vehicle to check if R5633411AB fits your vehicle.
    Posted by MoparPartsGiant Specialist
    Q:
    How do you properly remove and reinstall a cylinder head in four cylinder engine on Dodge Caravan? Posted by Customer
    A:
    Position the number one piston at Top Dead Center, relieve the fuel system pressure, then disconnect the cable from the negative terminal of the battery. Drain the cooling system and remove the coil packs, spark plug wires, and spark plugs. Remove the intake manifold, covering the intake ports on the manifold and cylinder head with duct tape to keep out debris and contamination. Remove the power steering reservoir and hoses, then the exhaust manifold, noting that the exhaust manifold is easier to remove after the cylinder head is detached. Disconnect the upper radiator hose from the thermostat housing and the electrical connector from the camshaft position sensor, as well as the connectors from the fuel injectors. Remove the timing belt, camshaft sprockets, idler pulley, and rear timing belt cover, followed by the camshafts, rocker arms, and valve lash adjusters. Loosen the cylinder head bolts in the reverse order of the tightening sequence until they can be removed by hand, taking care to note the location of different length bolts. Carefully lift the cylinder head straight up and place it on wood blocks to prevent damage, dislodging it if necessary. Remove all traces of old gasket material from the block and head, using special gasket removal solvents if available, while being cautious not to gouge the aluminum sealing surfaces. Place clean shop rags into the cylinders to keep out debris, use a vacuum to remove contamination, and chase the threads in the engine block with a tap of the correct size. Inspect all threaded fasteners for damage, particularly the cylinder head bolt threads for "necking," and replace any damaged bolts. Have the cylinder head and head bolts cleaned and inspected by a qualified automotive machine shop. For installation, place a new gasket and the cylinder head in position on the engine block, apply clean engine oil to the cylinder head bolt threads, and install them in their original locations. Tighten the cylinder head bolts in sequence, progressing in three stages to the specified torque, and after the third pass, tighten the bolts an additional 90-degrees. Install the rocker arms and hydraulic valve lash adjusters, followed by the rear timing belt cover, camshafts, and camshaft sprockets. Install the timing belt, then slowly rotate the crankshaft manually through two complete revolutions and recheck the camshaft timing marks. The installation of the remaining components follows the reverse order of removal. Refill the cooling system and check fluid levels, then start the engine and run it until normal operating temperature is reached, checking for leaks and proper operation.
    Posted by MoparPartsGiant Specialist
    Q:
    How do you properly remove and reinstall a cylinder head in four cylinder engine on Chrysler Town & Country? Posted by Customer
    A:
    Position the number one piston at Top Dead Center, relieve the fuel system pressure, then disconnect the cable from the negative terminal of the battery. Drain the cooling system and remove the coil packs, spark plug wires, and spark plugs. Remove the intake manifold, covering the intake ports on the manifold and cylinder head with duct tape to keep out debris and contamination. Remove the power steering reservoir and hoses, then the exhaust manifold, noting that the exhaust manifold is easier to remove after the cylinder head is detached. Disconnect the upper radiator hose from the thermostat housing and the electrical connector from the camshaft position sensor, as well as the connectors from the fuel injectors. Remove the timing belt, camshaft sprockets, idler pulley, and rear timing belt cover, followed by the camshafts, rocker arms, and valve lash adjusters. Loosen the cylinder head bolts in the reverse order of the tightening sequence until they can be removed by hand, taking care to note the location of different length bolts. Carefully lift the cylinder head straight up and place it on wood blocks to prevent damage, dislodging it if necessary. Remove all traces of old gasket material from the block and head, using special gasket removal solvents if available, while being cautious not to gouge the aluminum sealing surfaces. Place clean shop rags into the cylinders to keep out debris, use a vacuum to remove contamination, and chase the threads in the engine block with a tap of the correct size. Inspect all threaded fasteners for damage, particularly the cylinder head bolt threads for "necking," and replace any damaged bolts. Have the cylinder head and head bolts cleaned and inspected by a qualified automotive machine shop. For installation, place a new gasket and the cylinder head in position on the engine block, apply clean engine oil to the cylinder head bolt threads, and install them in their original locations. Tighten the cylinder head bolts in sequence, progressing in three stages to the specified torque, and after the third pass, tighten the bolts an additional 90-degrees. Install the rocker arms and hydraulic valve lash adjusters, followed by the rear timing belt cover, camshafts, and camshaft sprockets. Install the timing belt, then slowly rotate the crankshaft manually through two complete revolutions and recheck the camshaft timing marks. The installation of the remaining components follows the reverse order of removal. Refill the cooling system and check fluid levels, then start the engine and run it until normal operating temperature is reached, checking for leaks and proper operation.
    Posted by MoparPartsGiant Specialist
    Q:
    What precautions should be taken before beginning the cylinder head replacement procedure on Dodge Grand Caravan? Posted by Customer
    A:
    Allow the engine to cool completely before beginning this procedure. Position the number one piston at Top Dead Center. Disconnect the negative cable from the battery. Drain the cooling system and remove the spark plugs. Remove the intake/exhaust manifold; if only replacing the cylinder head gasket, it isn't necessary to remove the manifolds, but assistance may be needed to lift the head off the engine if the manifold is left attached. Remove the distributor, including the cap and wires. Remove the timing belt. Remove the valve cover. Loosen the head bolts in 1/4-turn increments until they can be removed by hand, following the recommended sequence to avoid warping the head. Lift the head off the engine, taking care not to pry between the head and block gasket mating surfaces to avoid damage; instead, pry against the casting protrusions on the sides of the cylinder head and set the head on blocks of wood to prevent damage to the gasket sealing surfaces. Cylinder head disassembly and inspection procedures are important, and it's advisable to have the head checked for warpage, even if just replacing the gasket. The mating surfaces of the cylinder head and block must be perfectly clean when the head is installed. Use a gasket scraper to remove all traces of carbon and old gasket material, then clean the mating surfaces with lacquer thinner or acetone. If there's oil on the mating surfaces when the head is installed, the gasket may not seal correctly and leaks may develop. Stuff the cylinders with clean shop rags to keep out debris while working on the block, and use a vacuum cleaner to remove any material that falls into the cylinders. Since the head is made of aluminum, be careful not to damage the mating surfaces with aggressive scraping. Check the block and head mating surfaces for nicks, deep scratches, and other damage; slight damage can be removed with a file, while excessive damage may require machining. Use a tap of the correct size to chase the threads in the head bolt holes, and mount each head bolt in a vise to run a die down the threads to remove corrosion and restore them, as dirt, corrosion, sealant, and damaged threads will affect torque readings. Place a new gasket on the block and set the cylinder head in position. Install the bolts, tightening them in four steps while following a specific sequence to the required torque. Reinstall the timing belt. Reinstall the remaining parts in the reverse order of removal. Be sure to refill the cooling system and check all fluid levels. Rotate the crankshaft clockwise slowly by hand through two complete revolutions and recheck the camshaft timing marks. Start the engine and check the ignition timing. Run the engine until normal operating temperature is reached, checking for leaks and proper operation.
    Posted by MoparPartsGiant Specialist
    Q:
    What final steps should be taken after reassembly for the 2003 Chrysler Town & Country? Posted by Customer
    A:
    Change the oil and filter, refill the cooling system, start the engine, and check for leaks and proper operation.
    Posted by MoparPartsGiant Specialist
    Q:
    What should be done if cracks are found on the cylinder head for the 1988 Dodge Grand Caravan? Posted by Customer
    A:
    Consult an automotive machine shop for repairs or obtain a new cylinder head if repair is not feasible.
    Posted by MoparPartsGiant Specialist
    Q:
    What should be done if the installed height exceeds specified limits for the 1999 Dodge Grand Caravan? Posted by Customer
    A:
    If the height exceeds specified limits, shims can be added under the springs to correct it, but do not shim the springs to the point where the installed height is less than specified.
    Posted by MoparPartsGiant Specialist
    Q:
    What needs to be removed after disconnecting the battery for the 2002 Dodge Grand Caravan? Posted by Customer
    A:
    Remove the intake manifold.
    Posted by MoparPartsGiant Specialist
    Q:
    What is important to do when disassembling the cylinder head for the 1994 Dodge Grand Caravan? Posted by Customer
    A:
    It is important to label and store parts separately for reinstallation in their original locations. Before removing the valves, label and store them with their components to keep them organized.
    Posted by MoparPartsGiant Specialist
    Q:
    How should decarbonizing chemicals be used for the 2007 Dodge Grand Caravan? Posted by Customer
    A:
    Decarbonizing chemicals can be useful for cleaning but should be handled with caution according to the instructions provided.
    Posted by MoparPartsGiant Specialist
    Q:
    What should be done after removing the intake manifold for the 2003 Dodge Grand Caravan? Posted by Customer
    A:
    Remove the rocker arm components and hydraulic lash adjusters, then detach the exhaust manifold(s), ensuring that each manifold may remain attached to the cylinder head until after the head is removed from the engine.
    Posted by MoparPartsGiant Specialist
    Q:
    What should be done with the ignition wires and spark plugs for the 2005 Dodge Caravan? Posted by Customer
    A:
    Disconnect the ignition wires and remove the spark plugs, labeling the ignition wires as well.
    Posted by MoparPartsGiant Specialist
    If you have any questions about this product, please don't hesitate to ask us. We will be happy to help you!

Genuine Mopar Part R5633411AB, the Right Choice

To ensure reliability, purchase Mopar part # R5633411AB Head-Cylinder. It is sometimes referred to as Jeep Cylinder Head. For Mopar owners with dreams of keeping their vehicles running in prime condition, choosing OEM parts is a smart decision. Meticulously crafted, these parts follow strict factory specifications and are manufactured in top-notch facilities with advanced technologies. Furthermore, they undergo rigorous testing to ensure durability and safety, making them a reliable choice for Mopar owners. This part fits specific Jeep Wrangler models.

MoparPartsGiant.com is a leading supplier of genuine Mopar parts and accessories such as Mopar R5633411AB Head-Cylinder. Wondering where to find exceptional quality and affordable OEM Mopar parts? You have already come to the right place. Our website boasts a huge selection of genuine Mopar parts at the most economical prices possible. What's more, all parts come with a manufacturer's warranty. For detailed Jeep parts information, click here.

Why choose Mopar Parts Giant

  • Dedicated Service

    Your complete satisfaction is our #1 goal

  • Lowest Prices

    Best deals on genuine OE parts from dealerships

  • Fast Delivery

    Orders are processed and delivered promptly