Make sure this part fits

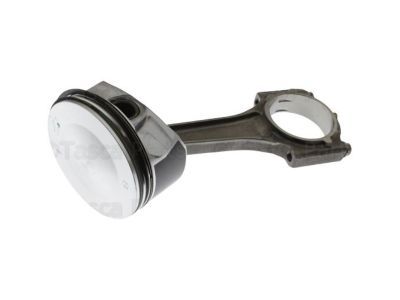
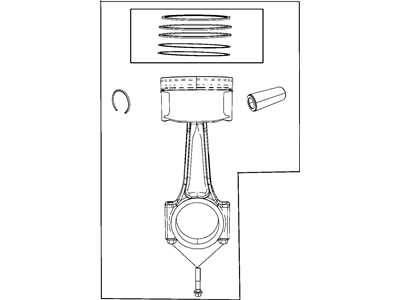
Jeep 53022257AD Piston

2009-2012 Jeep 53022257AD

Customer Questions & Expert Answers (10)
Mopar 53022257AD Piston
  • Part Description
    Piston Pin And Rod
  • Replaced By
    53022257AE
  • Manufacturer
    Mopar
Make sure this part fits
$166.58 MSRP: $253.00
You Save: $86.42 (35%)
1
ADD TO CART
  • Related Parts
  • Product Specifications
  • Vehicle Fitment
  • Customer Questions & Expert Answers
  • Product Specifications

    BrandGenuine Jeep
    Manufacturer Part Number53022257AD
    Part DescriptionPiston Pin And Rod
    Item Dimensions12.4 x 5.7 x 4.5 inches
    Item Weight3.70 Pounds
    ConditionNew
    ManufacturerMopar
    SKU53022257AD
    WarrantyThis genuine Mopar part is guaranteed by Mopar's factory warranty.
    Shipping & ReturnShipping Policy Return Policy
    Warning: California’s Proposition 65
  • Vehicle Fitment

    Year Make Model Engine Important vehicle option details
    2009-2010 Jeep Commander8 Cyl 5.7LLimited 2WD, Limited 4WD, Overland 2WD, Overland 4WD, Sport 2WD, Sport 4WD
    2009-2012 Jeep Grand Cherokee8 Cyl 5.7LLaredo 2WD, Laredo 4WD, Limited 2WD, Limited 4WD, Overland 2WD, Overland 4WD
  • Customer Questions & Expert Answers

    Q:
    Will this fit my truck? Posted by MoparPartsGiant Specialist
    A:
    You can Select Your Vehicle to check if 53022257AD fits your vehicle.
    Posted by MoparPartsGiant Specialist
    Q:
    How to remove and reinstall piston/connecting rod assemblies on Chrysler 300? Posted by Customer
    A:
    Get rid of any grooves at the top ring travel limit before removing piston/ connecting rod assemblies if there are any. Position the engine in relation to the crankshaft such that the crankshaft faces upwards. Use a feeler gauge to determine whether there is adequate play between the parts and, if not, consult an automotive machine shop. Make sure you mark all the rods and caps for identification purposes. Loosen bolts on connecting rod cap then take off the cap and bearing insert. Push out connecting rod/piston assembly through top of engine. Repeat for other cylinders. Fasten down with finger tight bearing inserts and reassemble rod caps. Check ring end gap on pistons then set if necessary. Fit rings into position starting with oil control ring." Last sentence is: Ensure smooth rotation of upper and lower side rails." Put in place middle and top rings." Clean cylinder walls thoroughly; chamfer upper edge of each cylinder bore." Put back piston/connecting rod assemblies having ensured that front mark on piston is facing toward front of engine" "Tap cylinder using hammer handle as piston enters it." Check connecting rod bearing oil clearance with Plastigage while greasing or applying engine assembly lube to bearing faces then reinstall rod caps." Repeat for other pistons/connecting rods". Turn crankshaft manually to test for binding; re-examine play between connecting rods after this process".
    Posted by MoparPartsGiant Specialist
    Q:
    What steps must be taken before removing the piston and connecting rod assemblies, and how should the installation of new piston rings be performed on Dodge Durango? Posted by Customer
    A:
    Before the piston and connecting rod assemblies could be pulled, the cylinder head and oil pan had to be dismantled. With the help of your fingernail, you should feel for any ridges at the upper end of ring travel-these must be flattened by a ridge reamer if present, otherwise the piston may break. After the removal of these ridges, position the engine in a manner that the crankshaft is on the upper side. Measure the connecting rod bearing clearance with the feeler gauges, that should be within the given tolerance; if not, one will require new connecting rods. There is nothing as confusing connecting rods and their respective caps and therefore should be easily distinguishable, the connecting rod cap bolts should then be loosened gently. Pull the connecting rod cap/bearing to free the insert while it remains engaged and, through the top of the engine, pop the connecting rod/piston. Do this for the other cylinders, to avoid damaging the glands, screws and lids of the caps and the inserts. The state of the pistons and the connecting rods will have to be assessed for further working or replacement they are thus prepared. Prior to replacing worn out piston rings you should always measure ring end gaps, while checking the piston ring side clearance. Arrange and spread out the piston/connecting rod assemblies and new rings in such a way that during the process of installation, they can be matched. Put top ring to the first cylinder, align it with the walls and check the end clearance with the feeler gauges. If the gap is wrong then it can also be corrected but slowly and with great focus. First insert the oil control ring, implement the middle ring and finally, the top one, making sure they face the right way. Before installation, one needs to see that the cylinder walls are clean, that the edges should be chamfered and the crankshaft inserted. Check and replace the connecting rod and cap bearing inserts with the help of a rod loser and be sure that they have to be set with a small clearance without any oil between them. Space the piston ring gaps correctly to allow oil to fill the gap, apply oil on the piston and the ring and use the piston ring compressor for purposes of putting them in place. After the connecting rod is inserted into the small end of the piston, try to push the piston and connecting rod assembly into the cylinder bore and feel if there is some sort of resistance. As mentioned check the bearing oil clearance of the connecting rod using Plastigage, also verify size and condition of the bearing inserts. If the clearance is not as specified, there could be much more to this than just indicating the type of clearance that is required. Remove all crudded up Plastigage if any, coat the bearing faces with grease or assembly lube and fit back the rod cap along with the new bolts and torque them to their recommended settings. The same process should be repeated till all the assemblies are cleaned and placed in the correct orientation. Following installation perform the crankshaft rotating to reveal binding problems and again check the amount of endplay of the connecting rod as it should be within limits.
    Posted by MoparPartsGiant Specialist
    Q:
    How to remove and reinstall piston/connecting rod assemblies on Dodge Charger? Posted by Customer
    A:
    Get rid of any grooves at the top ring travel limit before removing piston/ connecting rod assemblies if there are any. Position the engine in relation to the crankshaft such that the crankshaft faces upwards. Use a feeler gauge to determine whether there is adequate play between the parts and, if not, consult an automotive machine shop. Make sure you mark all the rods and caps for identification purposes. Loosen bolts on connecting rod cap then take off the cap and bearing insert. Push out connecting rod/piston assembly through top of engine. Repeat for other cylinders. Fasten down with finger tight bearing inserts and reassemble rod caps. Check ring end gap on pistons then set if necessary. Fit rings into position starting with oil control ring." Last sentence is: Ensure smooth rotation of upper and lower side rails." Put in place middle and top rings." Clean cylinder walls thoroughly; chamfer upper edge of each cylinder bore." Put back piston/connecting rod assemblies having ensured that front mark on piston is facing toward front of engine" "Tap cylinder using hammer handle as piston enters it." Check connecting rod bearing oil clearance with Plastigage while greasing or applying engine assembly lube to bearing faces then reinstall rod caps." Repeat for other pistons/connecting rods". Turn crankshaft manually to test for binding; re-examine play between connecting rods after this process".
    Posted by MoparPartsGiant Specialist
    Q:
    How to remove and inspect piston/connecting rod assemblies on Dodge Ram 1500? Posted by Customer
    A:
    Make sure that there are no ridges at the upper limits of ring travel before you take out the piston/rod assemblies; if there are, get rid of them. Position the crankshaft upwards to turn on the engine. In case they exist, use feeler gauges to measure connecting rod endplay and refer to an automotive machine shop. Note down all connecting rods and caps for identification purposes. Loosen (the bolts or nuts) that connect the cap to the bearing insert and retaining it in place. Push out the assembly of rod/piston through top of the engine. Repeat for remaining cylinders Reinstall connecting rod caps by inserting bearing inserts and finger tightening cap bolts or nuts The pistons with their respective connecting rods can now be inspected and overhauled Check end gaps of new piston rings prior to their installation Arrange all piston/rod assemblies together with new rings Put top ring into first cylinder and measure gap using a feeler gauge Adjust width as required Do likewise for every ring in every cylinder Having established/corrected end gaps, position rings onto pistons Install oil control ring first into number three, number two and then number one before mounting other rings Be sure that cylinder walls are clean, chamfered at each bore's top edge number one rod cap is removed from its end Clean surfaces carrying bearings on its face Lower and upper bearing inserts are inserted into a cap Insert piston/ring assembly through it until it reaches a point where fuel injectors align Apply lubrication to surfaces between piston rings Pour some clean engine oil onto these parts Attach compressor onto this piston Repeat above steps starting from zero Journal 1 lowermost point after applying oil between liners very gently slide this entire assembly within cylinder 1 keeping tapping upper side so as to guide it correctly next examine clearance regarding bearing oil of connecting rod before fixing permanently Plastigage will help in determining whether adjustments for clearance should be made Clean bearing faces or apply grease or lube Insert rod back onto journal and bolt cap on before tightening nuts/bolts until torque requirements Match all the other pistons/rods Do a manual rotation of crankshaft in ascertaining this. Finally, recheck connecting rod endplay.
    Posted by MoparPartsGiant Specialist
    Q:
    How to remove and inspect piston/connecting rod assemblies on Ram 2500? Posted by Customer
    A:
    Make sure that there are no ridges at the upper limits of ring travel before you take out the piston/rod assemblies; if there are, get rid of them. Position the crankshaft upwards to turn on the engine. In case they exist, use feeler gauges to measure connecting rod endplay and refer to an automotive machine shop. Note down all connecting rods and caps for identification purposes. Loosen (the bolts or nuts) that connect the cap to the bearing insert and retaining it in place. Push out the assembly of rod/piston through top of the engine. Repeat for remaining cylinders Reinstall connecting rod caps by inserting bearing inserts and finger tightening cap bolts or nuts The pistons with their respective connecting rods can now be inspected and overhauled Check end gaps of new piston rings prior to their installation Arrange all piston/rod assemblies together with new rings Put top ring into first cylinder and measure gap using a feeler gauge Adjust width as required Do likewise for every ring in every cylinder Having established/corrected end gaps, position rings onto pistons Install oil control ring first into number three, number two and then number one before mounting other rings Be sure that cylinder walls are clean, chamfered at each bore's top edge number one rod cap is removed from its end Clean surfaces carrying bearings on its face Lower and upper bearing inserts are inserted into a cap Insert piston/ring assembly through it until it reaches a point where fuel injectors align Apply lubrication to surfaces between piston rings Pour some clean engine oil onto these parts Attach compressor onto this piston Repeat above steps starting from zero Journal 1 lowermost point after applying oil between liners very gently slide this entire assembly within cylinder 1 keeping tapping upper side so as to guide it correctly next examine clearance regarding bearing oil of connecting rod before fixing permanently Plastigage will help in determining whether adjustments for clearance should be made Clean bearing faces or apply grease or lube Insert rod back onto journal and bolt cap on before tightening nuts/bolts until torque requirements Match all the other pistons/rods Do a manual rotation of crankshaft in ascertaining this. Finally, recheck connecting rod endplay.
    Posted by MoparPartsGiant Specialist
    Q:
    How to remove and inspect piston/connecting rod assemblies on Dodge Ram 2500? Posted by Customer
    A:
    Make sure that there are no ridges at the upper limits of ring travel before you take out the piston/rod assemblies; if there are, get rid of them. Position the crankshaft upwards to turn on the engine. In case they exist, use feeler gauges to measure connecting rod endplay and refer to an automotive machine shop. Note down all connecting rods and caps for identification purposes. Loosen (the bolts or nuts) that connect the cap to the bearing insert and retaining it in place. Push out the assembly of rod/piston through top of the engine. Repeat for remaining cylinders Reinstall connecting rod caps by inserting bearing inserts and finger tightening cap bolts or nuts The pistons with their respective connecting rods can now be inspected and overhauled Check end gaps of new piston rings prior to their installation Arrange all piston/rod assemblies together with new rings Put top ring into first cylinder and measure gap using a feeler gauge Adjust width as required Do likewise for every ring in every cylinder Having established/corrected end gaps, position rings onto pistons Install oil control ring first into number three, number two and then number one before mounting other rings Be sure that cylinder walls are clean, chamfered at each bore's top edge number one rod cap is removed from its end Clean surfaces carrying bearings on its face Lower and upper bearing inserts are inserted into a cap Insert piston/ring assembly through it until it reaches a point where fuel injectors align Apply lubrication to surfaces between piston rings Pour some clean engine oil onto these parts Attach compressor onto this piston Repeat above steps starting from zero Journal 1 lowermost point after applying oil between liners very gently slide this entire assembly within cylinder 1 keeping tapping upper side so as to guide it correctly next examine clearance regarding bearing oil of connecting rod before fixing permanently Plastigage will help in determining whether adjustments for clearance should be made Clean bearing faces or apply grease or lube Insert rod back onto journal and bolt cap on before tightening nuts/bolts until torque requirements Match all the other pistons/rods Do a manual rotation of crankshaft in ascertaining this. Finally, recheck connecting rod endplay.
    Posted by MoparPartsGiant Specialist
    Q:
    In what order should the new piston rings be installed for the 2011 Ram 1500? Posted by Customer
    A:
    Install the oil control ring first, followed by the number two ring and the number one ring.
    Posted by MoparPartsGiant Specialist
    See expert answers on similar Piston
    Q:
    What should be done after confirming the clearance for the 2015 Dodge Challenger? Posted by Customer
    A:
    Apply a layer of grease to the bearing faces, install the rod cap with new bolts, and tighten them to the specified torque.
    Posted by MoparPartsGiant Specialist
    See expert answers on similar Piston
    Q:
    What should be done before installing the piston/connecting rod assemblies for the 2017 Ram 3500? Posted by Customer
    A:
    Before installing the piston/connecting rod assemblies, ensure the cylinder walls are clean, the top edge of each cylinder bore is chamfered, and the crankshaft is in place. Remove the cap from the end of the number one connecting rod and clean the bearing surfaces. Install the upper and lower bearing inserts in the connecting rod and cap.
    Posted by MoparPartsGiant Specialist
    See expert answers on similar Piston
    If you have any questions about this product, please don't hesitate to ask us. We will be happy to help you!

Genuine Mopar Part 53022257AD, the Right Choice

To ensure reliability, purchase Mopar part # 53022257AD Piston. It is sometimes referred to as Jeep Piston. For Mopar owners with dreams of keeping their vehicles running in prime condition, choosing OEM parts is a smart decision. Meticulously crafted, these parts follow strict factory specifications and are manufactured in top-notch facilities with advanced technologies. Furthermore, they undergo rigorous testing to ensure durability and safety, making them a reliable choice for Mopar owners. This part fits specific Jeep Commander, Grand Cherokee models.

MoparPartsGiant.com is a leading supplier of genuine Mopar parts and accessories such as Mopar 53022257AD Piston. Wondering where to find exceptional quality and affordable OEM Mopar parts? You have already come to the right place. Our website boasts a huge selection of genuine Mopar parts at the most economical prices possible. What's more, all parts come with a manufacturer's warranty. For detailed Jeep parts information, click here.

Why choose Mopar Parts Giant

  • Dedicated Service

    Your complete satisfaction is our #1 goal

  • Lowest Prices

    Best deals on genuine OE parts from dealerships

  • Fast Delivery

    Orders are processed and delivered promptly