Make sure this part fits

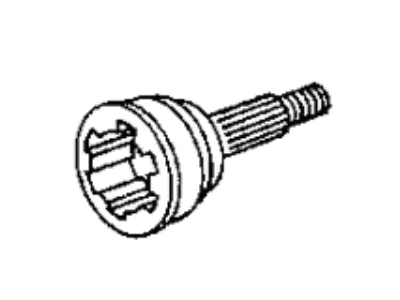
Mopar 4384702 Joint Component, Outer W/2.2 Efi (Gkn)

1987-1990 Mopar 4384702

Customer Questions & Expert Answers (5)
Mopar 4384702 Joint Component, Outer W/2.2 Efi (Gkn)
  • Part Description
    Joint Complete, Outer w/2.2 EFI (GKN)
  • Position
    Outer
  • Manufacturer
    Mopar
  • Manufacturer's Notes
    This part is discontinued.
Make sure this part fits
  • Related Parts
  • Product Specifications
  • Vehicle Fitment
  • Customer Questions & Expert Answers
  • Product Specifications

    BrandGenuine Mopar
    Manufacturer Part Number4384702
    Part DescriptionJoint Complete, Outer w/2.2 EFI (GKN)
    Item Dimensions5.1 x 5.0 x 6.8 inches
    Item Weight5.60 Pounds
    PositionOuter
    ConditionNew
    Fitment TypeDirect Replacement
    ManufacturerMopar
    SKU4384702
    WarrantyThis genuine Mopar part is guaranteed by Mopar's factory warranty.
    Shipping & ReturnShipping Policy Return Policy
    Warning: California’s Proposition 65
  • Vehicle Fitment

    Year Make Model Engine Important vehicle option details
    1990 Chrysler Imperial6 Cyl 3.3L
    1987-1990 Chrysler LeBaron4 Cyl 2.2L, 4 Cyl 2.5L, 6 Cyl 3.0L
    1987-1990 Chrysler New Yorker4 Cyl 2.2L, 4 Cyl 2.5L, 6 Cyl 3.0L, 6 Cyl 3.3L
    1990, 1987-1988 Chrysler Town & Country4 Cyl 2.2L, 4 Cyl 2.5L, 6 Cyl 3.0L, 6 Cyl 3.3L
    1987-1988 Dodge 6004 Cyl 2.2L, 4 Cyl 2.5L
    1987-1989 Dodge Aries4 Cyl 2.2L, 4 Cyl 2.5L
    1987-1990 Dodge Caravan4 Cyl 2.2L, 4 Cyl 2.5L, 4 Cyl 2.6L, 6 Cyl 3.0L, 6 Cyl 3.3L
    1987 Dodge Charger4 Cyl 2.2L
    1987-1990 Dodge Daytona4 Cyl 2.2L, 4 Cyl 2.5L, 6 Cyl 3.0L
    1988-1990 Dodge Dynasty4 Cyl 2.5L, 6 Cyl 3.0L, 6 Cyl 3.3L
    View More
  • Customer Questions & Expert Answers

    Q:
    This part will not fit my vehicle. Can you provide me with the part number for the bracket that will fit? TN. Posted by MoparPartsGiant Specialist
    A:
    You can Select Your Vehicle to check if 4384702 fits your vehicle.
    Posted by MoparPartsGiant Specialist
    Q:
    How to rebuild or replace a CV joint on Dodge Daytona? Posted by Customer
    A:
    Secure the drive axle in a vise and inspect the CV joint. If not, disassemble and inspect the joint. Remove the clamps and slide the boot back to access the tripod retention system. Clean and inspect all components. For outer CV joints, remove the boot clamps, clean the joint, and disassemble if necessary. You can clean and inspect all parts, and replace if needed. Apply oil to all components, assemble them, and pack lubricant into the ball races and grooves. Install the balls, cage, and cross. Install the boot and reinstall the drive axle.
    Posted by MoparPartsGiant Specialist
    Q:
    How to disassemble and inspect CV joints for driveaxles on Chrysler Imperial? Posted by Customer
    A:
    To begin, loosen the hub nut and wheel lug nuts, then elevate the vehicle and securely support it using jackstands. Next, remove the driveaxles and determine the type of CV joints present. For driveaxles with properly functioning CV joints and no noise or vibration issues, boot replacement is sufficient. However, if the CV joint exhibits significant wear or has operated without lubrication due to a damaged boot, disassembly and inspection become necessary. To disassemble the inner CV joint, remove the clamps and slide back the boot to access the tripod. Depending on the CV joint type, follow specific procedures: for early GKN driveaxles, bend the retaining tabs back with pliers while compressing the retention spring; for later GKN driveaxles, secure the CV joint housing in a vise and gently pull on the shaft to release the tripod rollers; for SSG driveaxles, remove the tripod using a wire ring retainer in a groove on the housing. Regardless of the type, support the housing to prevent excessive angles and roller detachment. Remove the snap-ring for all but later GKN axles. Clean the grease from the tripod assembly and inspect for wear, damage, corrosion, or excessive play, replacing damaged components. Inspect the inner splined area for wear and damage. Clean the housing, check its splines, ball races, spring, spring cup, and the spherical end of the shaft for wear, damage, nicks, and corrosion, replacing worn or damaged parts. Install a new boot, securing it with a clamp. For the outer CV joint, remove the boot clamps and push the boot back. If the CV joint was operating correctly with uncontaminated grease, replace the boot; otherwise, proceed with disassembly to assess if replacement is necessary. Clean the axle spline area, check for wear, and clean the outer CV joint bearing assembly, marking the relative positions of the components. Secure the housing shaft in a vise and remove the housing using a soft-face hammer, supporting the CV joint to prevent damage. For SSG driveaxles, mark the position of the damper weight, loosen the damper weight bolts, slide the weight and the boot toward the inner joint, remove the circlip with snap-ring pliers, and slide off the inner joint. Remove the boot and, if the CV joint was noisy or grease was contaminated, proceed with disassembly. Remove the circlip from the axle groove, clean the spline area, and inspect all components for damage, wear, corrosion, or cracks. Replace any unserviceable parts and, if needed, replace the outer housing wear sleeve. Prior to reassembly, apply a thin coat of oil to all CV joint components. Reassemble the CV joint components, aligning marks as needed, and install the cross in the cage. Rotate the cross into position in the cage and housing, ensuring the marks face out and are aligned. Pack the lubricant into the ball races and grooves, install the balls, place the driveaxle in the vise, slide the boot over it, and install a new circlip in the axle groove. Finally, position the CV joint housing on the axle, align the splines, and secure it by tapping with a soft-face hammer, verifying it's seated on the circlip by testing its pull resistance, then install the boot.
    Posted by MoparPartsGiant Specialist
    Q:
    How to disassemble and inspect CV joints for driveaxles on Dodge Grand Caravan? Posted by Customer
    A:
    To begin, loosen the hub nut and wheel lug nuts, then elevate the vehicle and securely support it using jackstands. Next, remove the driveaxles and determine the type of CV joints present. For driveaxles with properly functioning CV joints and no noise or vibration issues, boot replacement is sufficient. However, if the CV joint exhibits significant wear or has operated without lubrication due to a damaged boot, disassembly and inspection become necessary. To disassemble the inner CV joint, remove the clamps and slide back the boot to access the tripod. Depending on the CV joint type, follow specific procedures: for early GKN driveaxles, bend the retaining tabs back with pliers while compressing the retention spring; for later GKN driveaxles, secure the CV joint housing in a vise and gently pull on the shaft to release the tripod rollers; for SSG driveaxles, remove the tripod using a wire ring retainer in a groove on the housing. Regardless of the type, support the housing to prevent excessive angles and roller detachment. Remove the snap-ring for all but later GKN axles. Clean the grease from the tripod assembly and inspect for wear, damage, corrosion, or excessive play, replacing damaged components. Inspect the inner splined area for wear and damage. Clean the housing, check its splines, ball races, spring, spring cup, and the spherical end of the shaft for wear, damage, nicks, and corrosion, replacing worn or damaged parts. Install a new boot, securing it with a clamp. For the outer CV joint, remove the boot clamps and push the boot back. If the CV joint was operating correctly with uncontaminated grease, replace the boot; otherwise, proceed with disassembly to assess if replacement is necessary. Clean the axle spline area, check for wear, and clean the outer CV joint bearing assembly, marking the relative positions of the components. Secure the housing shaft in a vise and remove the housing using a soft-face hammer, supporting the CV joint to prevent damage. For SSG driveaxles, mark the position of the damper weight, loosen the damper weight bolts, slide the weight and the boot toward the inner joint, remove the circlip with snap-ring pliers, and slide off the inner joint. Remove the boot and, if the CV joint was noisy or grease was contaminated, proceed with disassembly. Remove the circlip from the axle groove, clean the spline area, and inspect all components for damage, wear, corrosion, or cracks. Replace any unserviceable parts and, if needed, replace the outer housing wear sleeve. Prior to reassembly, apply a thin coat of oil to all CV joint components. Reassemble the CV joint components, aligning marks as needed, and install the cross in the cage. Rotate the cross into position in the cage and housing, ensuring the marks face out and are aligned. Pack the lubricant into the ball races and grooves, install the balls, place the driveaxle in the vise, slide the boot over it, and install a new circlip in the axle groove. Finally, position the CV joint housing on the axle, align the splines, and secure it by tapping with a soft-face hammer, verifying it's seated on the circlip by testing its pull resistance, then install the boot.
    Posted by MoparPartsGiant Specialist
    Q:
    How can you inspect the CV joint boots for the 1984 Dodge Daytona? Posted by Customer
    A:
    To inspect the CV joint boots, raise the vehicle and support it securely on jackstands. Then, inspect the CV joint boots for cracks, leaks, and broken retaining bands.
    Posted by MoparPartsGiant Specialist
    If you have any questions about this product, please don't hesitate to ask us. We will be happy to help you!

Genuine Mopar Part 4384702, the Right Choice

To ensure reliability, purchase Mopar part # 4384702 Joint Component, Outer W/2.2 Efi (Gkn). It is sometimes referred to as Mopar CV Joint. For Mopar owners with dreams of keeping their vehicles running in prime condition, choosing OEM parts is a smart decision. Meticulously crafted, these parts follow strict factory specifications and are manufactured in top-notch facilities with advanced technologies. Furthermore, they undergo rigorous testing to ensure durability and safety, making them a reliable choice for Mopar owners. This part fits specific Chrysler Imperial, LeBaron, Town & Country models. It fits Dodge Caravan, Charger, Grand Caravan.

MoparPartsGiant.com is a leading supplier of genuine Mopar parts and accessories such as Mopar 4384702 Joint Component, Outer W/2.2 Efi (Gkn). Wondering where to find exceptional quality and affordable OEM Mopar parts? You have already come to the right place. Our website boasts a huge selection of genuine Mopar parts at the most economical prices possible. What's more, all parts come with a manufacturer's warranty. For detailed Dodge parts information, click here.

Why choose Mopar Parts Giant

  • Dedicated Service

    Your complete satisfaction is our #1 goal

  • Lowest Prices

    Best deals on genuine OE parts from dealerships

  • Fast Delivery

    Orders are processed and delivered promptly