Make sure this part fits

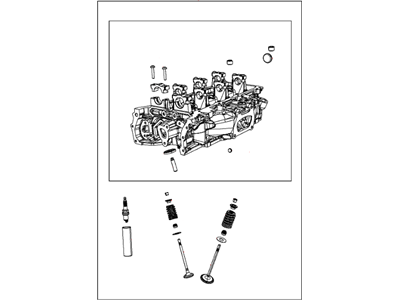
Chrysler RL141353AC Cylinder

2011-2013 Chrysler RL141353AC

Customer Questions & Expert Answers (24)
Mopar RL141353AC Cylinder
  • Part Description
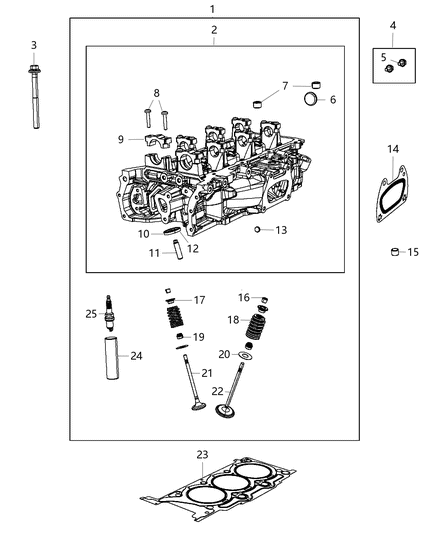
    Head Cylinder With Valves
  • Replaced By
    68141353AC
  • Manufacturer
    Mopar
Make sure this part fits
$986.97 MSRP: $1155.00
You Save: $168.03 (15%)
Core Charge: $150.00
1
ADD TO CART
  • Related Parts
  • Product Specifications
  • Vehicle Fitment
  • Customer Questions & Expert Answers
  • Product Specifications

    BrandGenuine Chrysler
    Manufacturer Part NumberRL141353AC
    Part DescriptionHead Cylinder With Valves
    Item Dimensions9.4 x 12.7 x 20.6 inches
    Item Weight36.60 Pounds
    ConditionNew
    Fitment TypeDirect Replacement
    ManufacturerMopar
    SKURL141353AC
    WarrantyThis genuine Mopar part is guaranteed by Mopar's factory warranty.
    Shipping & ReturnShipping Policy Return Policy
    Warning: California’s Proposition 65
  • Vehicle Fitment

    Year Make Model Engine Important vehicle option details
    2013, 2011 Chrysler 2006 Cyl 3.6LLX Sedan, Limited Convertible, Limited Sedan, S Convertible, S Sedan, Touring Convertible, Touring Sedan
    2011 Chrysler 3006 Cyl 3.6LBase RWD, Limited RWD
    2011 Chrysler Town & Country6 Cyl 3.6LGold, Limited, LX, Touring, Touring L
  • Customer Questions & Expert Answers

    Q:
    This part will not fit my vehicle. Can you provide me with the part number for the bracket that will fit? TN. Posted by MoparPartsGiant Specialist
    A:
    You can Select Your Vehicle to check if RL141353AC fits your vehicle.
    Posted by MoparPartsGiant Specialist
    Q:
    What precautions and steps should be taken when replacing a cylinder head in 2.7L V6 engine on Dodge Avenger? Posted by Customer
    A:
    This process should only be done when the engine is cool to touch and is best done at the weekend when you do not have to use the car. First of all, it is necessary to take off the primary timing chain and supply with sprockets. However, ensure that you do not move the crankshaft from around the alignment marks in the remainder of the entire process of the strop. Then it is time to take out the camshafts from the cylinder head, rocker arms accompanied by hydraulic lash adjusters, and remember to put labels and numbers to the removed parts to facilitate correct reinstallment of all of them in required positions. Then, it is time to uninstall the lower intake manifold and exhaust manifold(s)-if your car comes equipped with them. If remaining label and remove any coolant fittings, ground straps, cables, hoses, wires, or brackets that are connected to the cylinder head including the water outlet housing by loosing the heater supply tube retaining bolts. Apply a breaker bar and the specific socket that fits the specific bolt, and then turn the bolts in a quarter-turns to unscrew them until you are able to remove them by hand; this should be done in the reverse sequence as the tightening sequence in order to avoid warping or cracking of the head. Remove the cylinder head along with the exhaust manifold bolted on it, in case it is stuck then use a pry bar. All externals should be detached from the cylinder head in order to clean and examine before engaging a professional automotive machine shop for servicing. The mating surfaces of the cylinder head and block must be free from any deposit when the head is fitted. Scrape surfaces of the cylinder head and engine block with gasket scraper to remove all carbon and old gasket material without damaging the surfaces After scraping wash the surfaces with lacquer thinner or acetone. Any residual oil that remains on the corresponding surfaces of the head after the installation of the gasket maybe insufficient to make a good seal thus resulting in leakage. Before the cylinder is filled with the material, use clean shop rags to pack it in order to minimize accumulation of debris inside the cylinder and for the removal of any material that may have fallen inside the cylinder, a vacuum cleaner is used. Inspect shoulder of block/head for nicks, scratches, or other signs of wear; maximum allowable dimension is 0.025mm; if beyond this, a file may be used to remove the material or you must machine it. What is left can be removed with compressed air This is done by using a tap of the right size to chase the threads of the head bolt holes. Inspect each cylinder head bolt for stretch by taking a metal ruler or a straightedge and laying it on the threads; the fact is that the diameter of the threads of such bolts tends to be necked down somewhere, in which case the bolts are to be replaced. In any case it is recommended that the head bolts are replaced with new ones irrespective of the state they are in. Using a precision straightedge and a set of feeler gauges, check the cylinder head for warpage; if the same is more than the allowable limit, have the head mugged. Replace the head bolts and nuts, trim the 'riblet' edged gasket along with the flange face of the head, and place the new cylinder head gasket over the dowel pins present on the block and placing the head over the dowels without further upsetting the position of the gasket. These bolts should be then lubricated with little proportions of clean engine oils before fixing them in position with the chamfered side facing the bolt head and the hardened washers going round the cylinder head. Replace the bolts back to their original positions and fasten them a little and then turn the bolts in stages up to the required torque. Place the lash adjusters and rocker arms in their rightful positions in the cylinder head and fit the camshafts and then fit the primary timing chain and sprockets. The rest of the installation process is, in fact, the reverse of removal. Last but not the least, add more coolant in the cooling system and replace the engine oil along with the oil filter, and crank the engine and inspect for the presence of any oil or coolant leakage.
    Posted by MoparPartsGiant Specialist
    Q:
    How do you remove and install Cylinder Head in four cylinder engine on Chrysler 200? Posted by Customer
    A:
    To remove the components, begin by loosening the lug nuts on the right front wheel, raising the vehicle, and securing it on jackstands. Remove the right front wheel, splash shields, and inner fender liner. Position the number one piston at Top Dead Center and disconnect the negative battery cable from the remote ground terminal. Remove the engine cover, drain the cooling system, and take out the spark plugs. Next, remove the air filter housing, coolant reservoir, and power steering reservoir without disconnecting the lines. Remove the drivebelts and the intake manifold, covering the intake ports with duct tape. Detach the power steering hose bracket bolt and secure the pump out of the way without disconnecting the hoses. Remove the exhaust manifold, ignition coils, and spark plugs, followed by the valve cover. Take off the water pump pulley, air conditioning compressor, and bracket, then remove the timing chain cover and timing chain. Remove the camshaft bearing caps, camshafts, and lifters, storing the lifters for reinstallation in their original locations. For 2015 and later models, remove the WAA assembly. Loosen the cylinder head bolts in reverse of the tightening sequence until they can be removed by hand, taking notes on their locations. Carefully lift the cylinder head straight up, placing it on wood blocks to prevent damage. If it sticks, dislodge it gently. After removal, use needle nose pliers to take out the WT filter from the engine block and clean all old gasket material from the block and head, ensuring no debris falls into the engine. For installation, place a new or cleaned WT filter into the cylinder block, apply RTV sealant at the timing chain side ends, and position a new gasket and the cylinder head. Check the head bolt threads for gaps and apply clean engine oil before installation. Place washers on the first two head bolts, install the head bolts, and tighten them in stages according to the recommended sequence. Ensure to identify the type of cylinder head bolts for proper torque. The final tightening requires a specific number of degrees, which can be measured with an angle-torque gauge. Reinstall the timing chain and cover, then follow the reverse order for the remaining installation steps. Refill the cooling system, change the engine oil and filter, and rotate the crankshaft clockwise through six complete revolutions, rechecking the camshaft timing marks. Finally, start the engine and run it until normal operating temperature is reached, checking for leaks and proper operation.
    Posted by MoparPartsGiant Specialist
    Q:
    What should be done with the cooling system for the 2013 Chrysler 200? Posted by Customer
    A:
    Drain the cooling system, then remove the air filter housing and the coolant recovery bottle.
    Posted by MoparPartsGiant Specialist
    Q:
    How should the cylinder head bolts be checked for the 2008 Dodge Challenger? Posted by Customer
    A:
    Check each cylinder head bolt for stretching using a metal ruler or straightedge; replace any bolts that have necked down.
    Posted by MoparPartsGiant Specialist
    Q:
    What additional items need to be labeled and removed for the 2015 Chrysler 200? Posted by Customer
    A:
    Label and remove any remaining items attached to the cylinder head, such as coolant fittings, ground straps, cables, hoses, wires, or brackets, including the water outlet housing by detaching the heater supply tube retaining bolts.
    Posted by MoparPartsGiant Specialist
    Q:
    What should be done after installing the cylinder head for the 2011 Chrysler 200? Posted by Customer
    A:
    Follow the reverse order of removal for the remainder of the installation, concluding with an oil and filter change and refilling the cooling system.
    Posted by MoparPartsGiant Specialist
    Q:
    What is the procedure for tightening the bolts for the 2015 Dodge Challenger? Posted by Customer
    A:
    Tighten the bolts in the recommended sequence to the specified torque.
    Posted by MoparPartsGiant Specialist
    See expert answers on similar Cylinder Head
    Q:
    What is the next step after removing the air filter housing and reservoirs for the 2014 Dodge Avenger? Posted by Customer
    A:
    Remove the drivebelts and the intake manifold, covering the intake ports with duct tape.
    Posted by MoparPartsGiant Specialist
    Q:
    What should be done with the timing belt covers for the 2011 Dodge Avenger? Posted by Customer
    A:
    Take off the timing belt covers, align the TDC marks, and remove the timing belt, marking its direction of rotation if it is to be reused.
    Posted by MoparPartsGiant Specialist
    Q:
    What should be done with the wires and hoses connected to the cylinder heads for the 2014 Dodge Avenger? Posted by Customer
    A:
    Disconnect all wires and vacuum hoses from the cylinder heads, labeling them for reinstallation.
    Posted by MoparPartsGiant Specialist
    Q:
    What should be done to the head bolt holes for the 1989 Dodge Grand Caravan? Posted by Customer
    A:
    Use a tap of the correct size to chase the threads in the head bolt holes.
    Posted by MoparPartsGiant Specialist
    See expert answers on similar Cylinder Head
    Q:
    Why is it important to inspect the cylinder head(s) after cleaning for the 1995 Dodge Grand Caravan? Posted by Customer
    A:
    It is important to inspect the cylinder head(s) to assess any damage, especially if the engine was severely overheated, as this may cause the cylinder head to warp.
    Posted by MoparPartsGiant Specialist
    Q:
    What should be done before installing the rocker arm assembly for the 1993 Dodge Grand Caravan? Posted by Customer
    A:
    Apply moly-base grease to the rocker arm faces and the shaft.
    Posted by MoparPartsGiant Specialist
    Q:
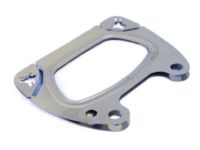
    How do you remove the exhaust manifold(s) for the 2014 Dodge Challenger? Posted by Customer
    A:
    Remove the exhaust manifold(s) from the cylinder head(s). Note that on 2015 and later Challenger models with 5.7L engines and all models with the 6.4L engine, the exhaust manifolds can only be removed after the cylinder head has been detached.
    Posted by MoparPartsGiant Specialist
    Q:
    What should be done for the right cylinder head for the 2018 Dodge Challenger? Posted by Customer
    A:
    Remove the power steering pump, heater core tube fasteners, battery and battery tray, and oil dipstick tube fastener.
    Posted by MoparPartsGiant Specialist
    Q:
    What initial preparations should be made before starting the cylinder head removal process for the 2017 Ram 1500? Posted by Customer
    A:
    Before starting, disconnect the batteries' negative terminals and drain the coolant.
    Posted by MoparPartsGiant Specialist
    Q:
    What should be checked on each valve spring for the 1993 Dodge Grand Caravan? Posted by Customer
    A:
    Check for wear and pits, measure the free length, and ensure it meets specifications.
    Posted by MoparPartsGiant Specialist
    Q:
    How should the cylinder head bolt pattern be outlined for the 2005 Dodge Grand Caravan? Posted by Customer
    A:
    Using a new head gasket, outline the cylinders and bolt pattern on cardboard, indicating the front of the engine, and punch holes at the bolt locations.
    Posted by MoparPartsGiant Specialist
    Q:
    What is the procedure for installing the bolts for the 2020 Dodge Grand Caravan? Posted by Customer
    A:
    Install the bolts in their original locations, tightening them finger tight, and then follow the recommended sequence to tighten the bolts in three steps to the specified torque.
    Posted by MoparPartsGiant Specialist
    Q:
    What is commonly available for most engines at dealerships and auto parts stores for the 2009 Dodge Grand Caravan? Posted by Customer
    A:
    New and rebuilt cylinder heads are commonly available for most engines at dealerships and auto parts stores.
    Posted by MoparPartsGiant Specialist
    Q:
    What should be done after removing the intake manifold and timing components for the 2013 Ram 1500? Posted by Customer
    A:
    After that, raise and securely support the front of the vehicle and unbolt the exhaust pipes from the exhaust manifolds.
    Posted by MoparPartsGiant Specialist
    See expert answers on similar Cylinder Head
    Q:
    What components need to be disconnected before removing the cylinder head for the 2012 Ram 1500? Posted by Customer
    A:
    Before removing the cylinder head, you should disconnect all wires and vacuum hoses from the cylinder heads. Also, disconnect the ignition coils and spark plugs. Remove the catalytic converter(s), valve covers, crankshaft pulley, and oil pans.
    Posted by MoparPartsGiant Specialist
    Q:
    What are the remaining steps to complete the installation for the 2016 Ram 1500? Posted by Customer
    A:
    Complete the remaining installation steps in reverse order. Finally, add coolant, change the engine oil and filter, and start the engine to check for proper operation and leaks.
    Posted by MoparPartsGiant Specialist
    If you have any questions about this product, please don't hesitate to ask us. We will be happy to help you!

Genuine Mopar Part RL141353AC, the Right Choice

To ensure reliability, purchase Mopar part # RL141353AC Cylinder. It is sometimes referred to as Chrysler Cylinder Head. For Mopar owners with dreams of keeping their vehicles running in prime condition, choosing OEM parts is a smart decision. Meticulously crafted, these parts follow strict factory specifications and are manufactured in top-notch facilities with advanced technologies. Furthermore, they undergo rigorous testing to ensure durability and safety, making them a reliable choice for Mopar owners. This part fits specific Chrysler 200, 300, Town & Country models.

MoparPartsGiant.com is a leading supplier of genuine Mopar parts and accessories such as Mopar RL141353AC Cylinder. Wondering where to find exceptional quality and affordable OEM Mopar parts? You have already come to the right place. Our website boasts a huge selection of genuine Mopar parts at the most economical prices possible. What's more, all parts come with a manufacturer's warranty. For detailed Chrysler parts information, click here.

Why choose Mopar Parts Giant

  • Dedicated Service

    Your complete satisfaction is our #1 goal

  • Lowest Prices

    Best deals on genuine OE parts from dealerships

  • Fast Delivery

    Orders are processed and delivered promptly